First, stock solutions are prepared as described in the product manual (example below).
REAGENT PREPARATION Bring all reagents to room temperature before use. Allow all components to sit for a minimum of 15 minutes with gentle agitation after initial reconstitution. Working dilutions should be prepared and used immediately.
Streptavidin-HRP: Each vial contains 2.0 mL of streptavidin conjugated to horseradish-peroxidase. Dilute to the working concentration specified on the vial label using Reagent Diluent.
Mouse Anti-Human IL-6 Capture Antibody: Refer to the lot-specific C of A for amount supplied. Reconstitute each vial with 0.5 mL of PBS. Dilute in PBS without carrier protein to the working concentration indicated on the C of A.
Biotinylated Goat Anti-Human IL-6 Detection Antibody: Refer to the lot-specific C of A for amount supplied. Reconstitute each vial with 1.0 mL of Reagent Diluent. Dilute in Reagent Diluent to the working concentration indicated on the C of A.
Recombinant Human IL-6 Standard: Refer to the lot-specific C of A for amount supplied. Reconstitute each vial with 0.5 mL of deionized or distilled water.
Working Solution
Second, working solutions are reconstituted based on certificate of analysis (C of A) provided by kit manufacturer to achieve desired concentrations as described in the conversion table.
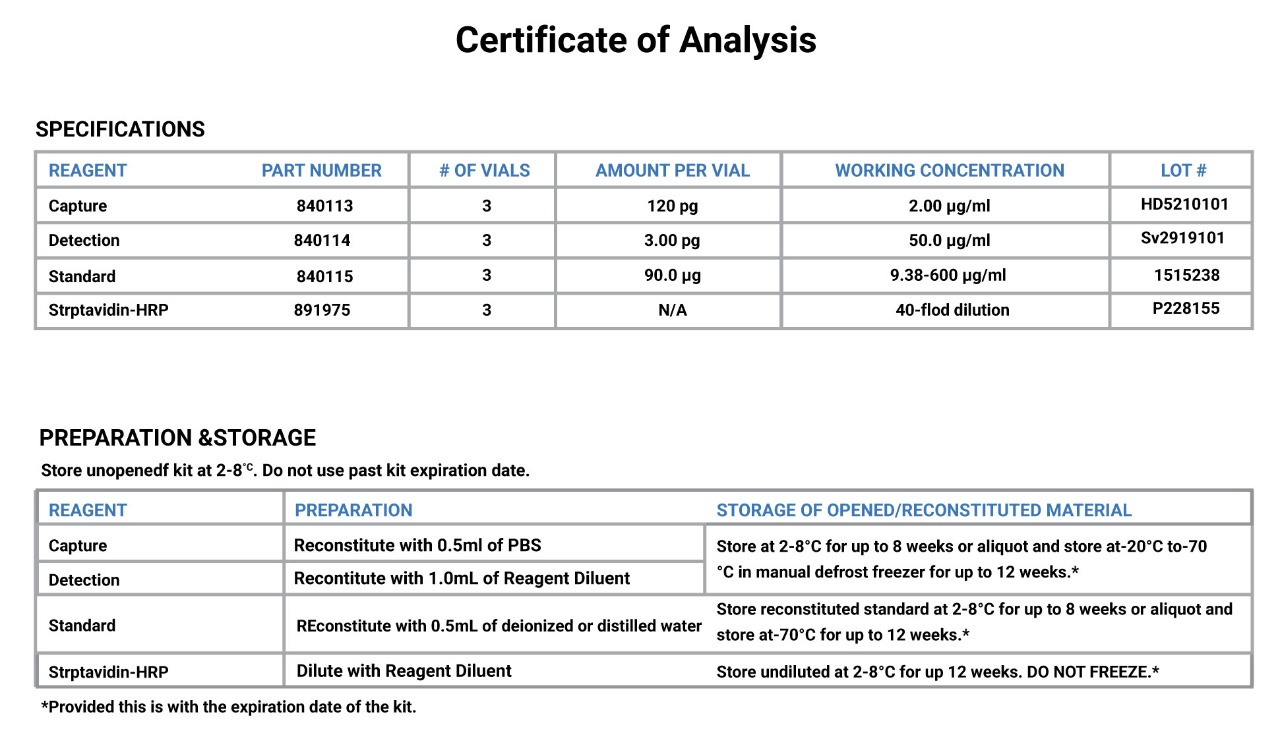
An example of C of A of Human IL-6 ELISA kit is shown as below.
Certificate of Analysis
Protocol
Step
Concentration
Buffer
Volume (µL)
Incubation (min)
Capture
4 µg/ml
(60x dilution from stock solution)*
PBS
20
60
Blocking
1x
1%BSA
20
30
After coating with capture and blocking, the MicroFluere® well plate can be stored in cool dry place for future use, or we can immediately follow following steps.
Step
Concentration
Buffer
Volume (µL)
Incubation (min)
Standard/Sample
Start with 9.6 ng/mL (18.75x dilution from stock solution)*, 2-fold serial dilution until 9.375 pg/mL (11 standards)
1%BSA
20
15
Detection
50 ng/ml
(60x dilution from stock solution)*
1%BSA
20
15
HRP
1:25 dilution
1%BSA
15
5
Wash 3 times
1x washing buffer (25x dilution from stock solution)*
20
–
Wash 1 time
PBS
20
–
Substrate
—
—
13
5-15
*Dilution factors as described in the above table are based on the example C of A. The C of A may change lot to lot. Therefore, dilution factors need to be calculated based on recommended working concentrations for MicroFluere®.
Assay Procedure
*When mixing antibody working solutions DO NOT vortex/mix them. Only pipette up and down. Vortex is okay for HRP/Substrate* (Please see more detail in liquid handling tips section.)
Make a working solution of capture antibody; Dispense 20 µL in each well– ensure the liquid flows through the channels; Incubate 60 minutes and then drain the solution using the drainage device
Dispense 20 µL of blocking buffer in each well; Incubate 30 minutes and then drain the solution using the drainage device
After this step, the plate can be stored in cool and dry place for future use.
Make standards start with the highest concentration and serial dilutions; Dispense 20 µL in each well; Incubate 15 minutes and then drain the solution using the drainage device
In this step, samples can be loaded together with calibration standards.
Make a working solution of detection antibody; Dispense 20 µL in each well; Incubate 15 minutes and then drain the solution using the drainage device
Make a working solution of HRP; dispense 15 µL in each well; Incubate 5 minutes and then drain the solution using the drainage device
Wash with washing buffer (i.e., dispense 20 µL in each well and then drain the solution using the drainage device), repeat 2 times
Wash with PBS buffer (i.e., dispense 20 µL in each well and then drain the solution using the drainage device)
Make working solution of substrate (50:50:1 peroxide: enhancer: ADHP concentrate QuantaRed); Dispense 13 µL/well and incubate covered 5-15 minutes. Do not use stop solution. Do not drain the substrate. The plate is ready to read with a fluorescence microplate reader.
Read with a Fluorescence microplate reader ( ~550 nm excitation and 605 nm emission wavelengths)
Drainage device note:
Insert a new absorbent pad and closes the lid. Wait for ~30 seconds before pressing the pump three to five times. Wait for ~20 seconds, then remove the plate. (Please see more detail in the Drainage Device video.)
Sample preparations note:
Sample can be diluted in 1x of Reagent Diluent Concentrate 2 (1% BSA) with desired dilution.
Tips for ELISA with MicroFluere Plates
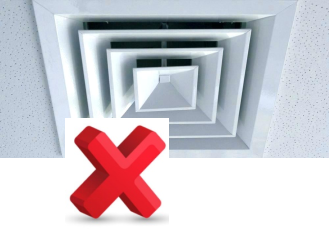
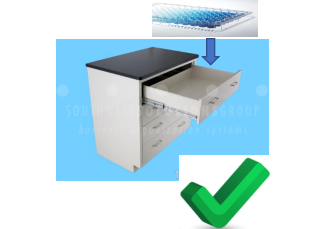
1.Before starting, make sure the environment is free of any fans that could cause evaporation. After every step make sure to put plates in a sealed container or drawer or box.
2.When mixing solutions there are two groups. One (for standard, detection, capture, wash, and reagent diluent) we recommend pipetting up and down 5 times. DO NOT use the vortex machine to mix for this group. The other group (for HRP and Substrate) it is okay to use a vortex machine to mix. When extracting liquid using a pipette, make sure the tip is below the top surface. This will ensure no air bubbles are pulled up. (See videos entitled “Pipetting.mp4” and “Pipetting2.mp4”).
3.Make sure you have enough volume of liquid for each step. It is recommended to go over the expected amount. In this case I made 500ul of standard for each row (even though I only needed 8channels*20ul/channel = 160uL) (See video entitled “StandardCurve.mp4”)
4.When creating a standard curve, make sure the liquid fully covers the bottom of the reservoir. Once liquid is in the pipette, start expelling at one end of the reservoir. Slowly move the pipette down the length of the reservoir while expelling until the entire bottom surface is covered. This ensures that the multichannel pipette does not pick up any bubbles. (See video entitled “Reservoir.mp4”) Also, make sure to pipette up and down a couple times (DO NOT generate bubbles.) when going from one concentration to the next. This ensures there is no loss of signal without having to switch tips between each standard. (see video entitled “PipettingStandard.mp4”)
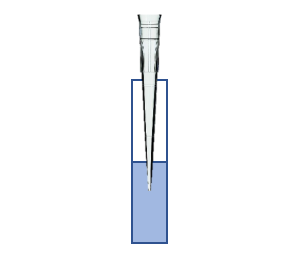
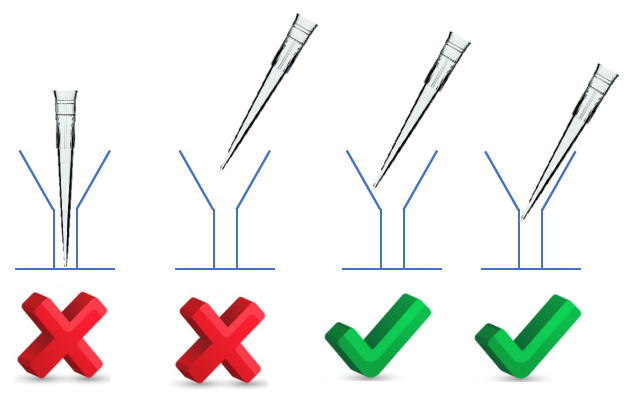
1.When pipetting into the channels, make sure the pipette tips are exactly aligned over the microchannel openings. Go as far down into the opening as you can without touching the film at the bottom (see far right) especially in capture and standard steps. (see video entitled “PipettingStandard.mp4”) For the other steps, you can simply touch the pipette to the funnel wall as shown in the third image. Slowly and continuously release the liquid into the channel.
2.Like a standard ELISA, it is advised to wash after each draining step. We’ve found that R&D Systems Wash Buffer (stock 25x) diluted 1:10 in diH20 works best.